Sunday, October 28, 2012

Machine Embroidery using Rubber Stamps and Angelina Fibers

I'm off to the Houston Quilt Festival tomorrow so if you are going to be there stop by the Embellishment Village Booth and see me!!  I'm really looking forward to going and sharing so of the exciting new things we are doing with Angelina Fibers.  This post I'm going to share how you can make a piece of textured Angelina and then use this in your machine embroidery.  If you want to more about Machine Embroidery using Angelina Fibers and Film you can contact me at www.cowgirlquiltdesigns.com and request a copy of my detailed instructions. 
Textured Angelina


This technique produces a gorgeous piece of Angelina with an embossed design.  I think that textured Angelina gives the look of embossed metals and I particularly like to use it in appliqué designs as the fabric component.  Since Angelina is a Polyester-based fiber what you are doing when you create a piece of textured Angelina is creating a piece of fabric, which you can use just like you would use any other fabric. 
1.      Use your Stamplates or Texture your Textiles stamps to get this effect.  These stamps are created specifically for fabric stamping, using the deep etch method so they are deeper than a regular crafting stamp.  The fibers can get into the crevices of the stamp and the result is a beautiful embossed piece of Angelina.  My favorite stamp to use is the Swirls pattern.  My favorite color of Angelina to use is Peacock.
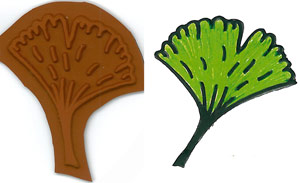
Texture Your Textile Stamp -Swirls Pattern
2.     Take your stamp and place it design side up on your surface (I always use my pressing sheet “book”). 
3.     If you are using a light shade of Angelina, you can apply some ink to the stamp.  Use Pigment Ink (I recommend Colorbox Pigment Ink) as it becomes permanent when ironed, so you can wash and dry it.  If you are using a dark shade of Angelina, I generally don’t use ink.  To apply the ink, take your ink pad and hold it upside down in your hand between your thumb and fingers.  Now you can pounce the ink pad directly onto the stamp’s design for full coverage.
4.     Put a clump of Angelina over the top of the stamp.  It doesn’t matter how thin or thick it is, you just need to cover the entire stamp.  Leave the Angelina hanging off the edges.  Anything you cut off after embossing the Angelina, can be re-used, so nothing goes to waste. 
5.     Put the top of the Pressing Sheet “Book” over the top of the Angelina covered stamp.  If you are right handed, put your left hand on the left lower corner of the pressing sheet to hold it down while you drag the iron across the stamp with your iron held in your right hand (lefties do the reverse).  Remember, you are dragging it across, rather than pressing down.  As soon as you start to see the design show through the pressing sheet it is done. 
6.     Remove the textured piece of Angelina from the stamp (it won’t stick).  Use this piece as the fabric element in any appliqué machine embroidery design and take your design to the next level! 
7.     Embroider your appliqué design as usual, except the Textured Angelina will be your fabric.

Have Fun!

Saturday, October 20, 2012

Machine Embroidery with Angelina Fibers and Film

Hi I'm back and I have to share my article with you about how to do Machine Embroidery with Angelina Fibers and Film.  Since I'm a big Do-Do and can figure out how to add a link or attach a file- I'll give you a new technique each day.  Hope you enjoy: Toady we are going to learn about Angelina fibers and Film and some of the tings you can do with them.


Angelina is a polyester based fiber developed for the space industry.It does not melt.  It won’t melt on your iron or fabric.  It will only bond to itself.  Best of all, it is completely, washable, dryable and dry-cleanable!  The materials needed to work with Angelina are the most basic and simple.  An iron and a non-stick pressing sheet are all that are needed.  Optional items include powdered fusible (I recommend Bo-Nash magic fusible powder), and a texture stamp (I recommend Stamplates, Texture your Textile Stamps).  For machine embroidery, you will need your design (any kind will work), water-soluble stabilizer and appropriate threads.  The best thing is you won’t need any metallic thread – Angelina  provides all the sparkle your design needs!

Angelina Fibers and FilmFirst let me give you a little information about Angelina.  This will help you determine which type of Angelina to use in your projects.  Angelina Fiber comes in two different “cuts” – straight cut or crimped cut.  


1.      Straight cut Angelina:  Straight cut Angelina will yield the sparkly results you love, but it delivers more of a sheen.  The straight cut is wonderful to use for needle-felting.  Straight cut will work with needle-felting or embellishing machines as well as hand felting.  You can also texturize it by placing it over a stamp (more on the technique latter) and use that in your embroidery.
2.     Crimped Cut:  My usual recommendation for machine embroidery.  The fiber itself is slightly wider than the straight cut (which makes it unsuitable for needle-felting), and has V-shaped crimps down the length of the strand.  It is highly refractive.  Where the straight cut gives off sheen, the crimped cut yields sparkle and texture.  Tip:  you can mix the two cuts together.   For example, if you love a straight cut color (i.e. copper) and it only comes in straight cut but you want more texture and sparkle, mix it with a crimped cut shade (gold, peacock, pink tickle or watermelon) to get the extra sparkle.

Then there is Angelina Film, which is similar to Mylar.  Why Angelina Film is superior to Mylar, is that Mylar only comes in one color fast color (white) while Angelina Film comes in 18 different colorfast shades – each one which will give you a different effect.  These looks range from metal to glass (wow!).  More on the Film later.

Next we will learn about how to make a cobweb of Angelina to enhance  cutwork lace or snowflake designs.

Wednesday, July 11, 2012


Tonight I am going to my sewing class which is offered through the Adult Continuing Education Program.  Check out to see if you have such a program in your community.  I found out that here in San Diego the programs are free to all.  In fact, when I registered I had to include my educational background and I was afraid they might not let me in because I have a degree - but no problem.  These classes are free to all, no matter what's your educational background or how much or how little income you have (what a deal, we should all take advantage of this -- after all our tax dollars are paying for it).  Anyway, one of the great things about taking a class like this, is being around other creative people.  It just inspires you!  You end up brainstorming new and different ideas and pretty soon you have new and fresh ideas.  The main thing I am learning is the importance of Fit and practice pieces.  In class we are making a reversible jacket.  Never one to do it the easy way, I decided to use fabric that had a different look on the front and reverse side.  Most of the other students are using quilted reversible fabric.  But as one of my classmates said, I don't want to look like a sausage in the quilted fabric.  It is a challenge especially considering how to finish seams so they look nice on both sides and still be able to embellish it.  I'm planning on using some Angelina Appliques on one side and couched on fibers and beads on the other side.  Here is a picture of the collar I've put together.  On the shiny gold side I used Angelina Appliques made from my Ginkgo stamp.  They are very easy to make.  Simply take the Stamp. put it image side up on your pressing sheet.  I fold my pressing sheet like a book to make it even easier to use.  Put a little clump of Peacock colored Angelina on top.  Cover with the pressing sheet, then drag your iron across until you see the design show through.  It only takes two to three swipes and your done.  Zig-zag stitch it onto whatever you want.  Here is my Ginkgo stamp, available for $5 on my website, www.cowgirlquiltdesigns.com.  It's hard to find a nice ginkgo stamp and this one is nice because although it's bold and graphic it has enough detail to really distinguish it as a Ginkgo leaf.


Friday, July 6, 2012

Hello - Here is my first post on my new blog (wow!).  This blog will tell you all about all the cool new tips, tricks and techniques I've discovered using Rubber stamps for stamping on fabric and using them to work with textiles.  I also design quilt patterns so I will share some of those periodically as well.  My new website will be live on July 10th, 2012, so you can go online at www.cowgirlquiltdesigns.com and see all the products I produce.  At the end of July, I will be going to the Quilts Inc International Quilt Festival in Long Beach California.  I will be demonstrating Angelina Fibers with Embellishment Village and encourage you to come by and see all the great things they will have in their booth.  I will also be teaching at  Create on the Spot during the Festival, and you will be able to create two fingertip towels using Angelina to make the appliques.  Here's a picture of the project.